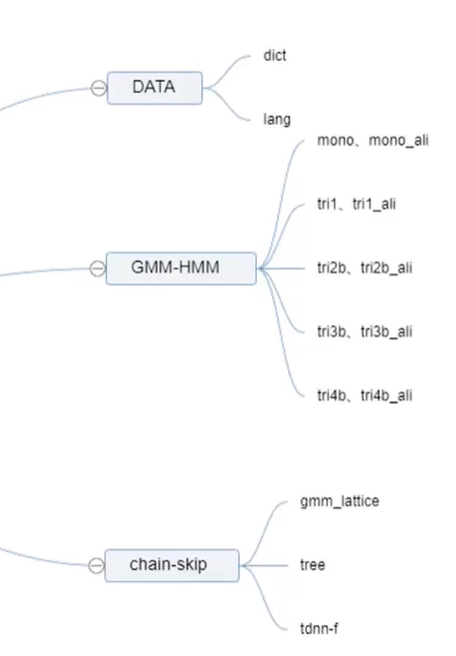
Any ASR system can be just divided into three parts:
Acoustic Model
Language Model
Decoder
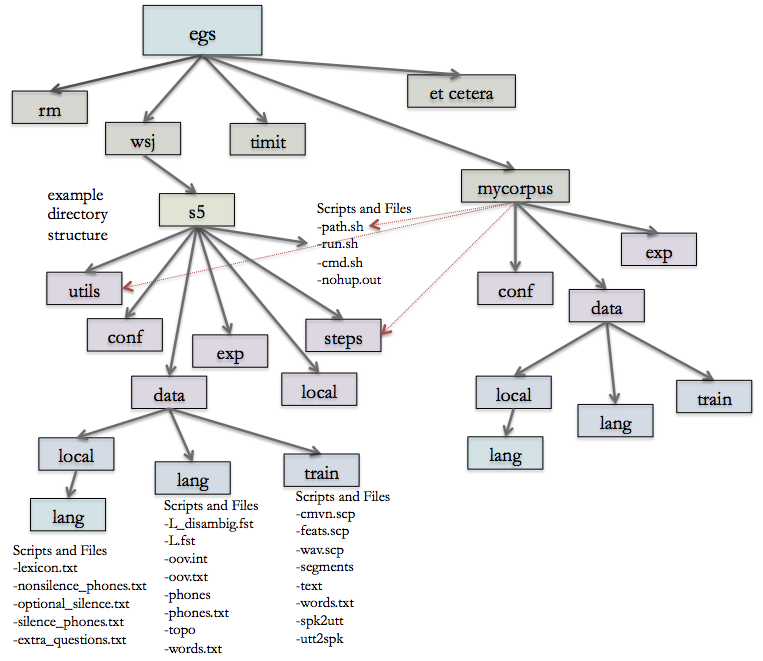
Kaldi has a lot of examples in its projects.There are two necessary raw materials for us to train the model:
.wav file
labelled .txt
We need four necessary elements in Kaldi! We call it “HCLG.fst”, we can make speech recognition from these core file. Acutally, just like we are building a map, and we just decode all the paths from there in order to get the prediction results. The underneath idea just like from the typology from the mathematics. We are using Viterbi algorithm to decoding our HCLG.fst. The exact name should be token passing method, which is a kind of variant algorithm of Viterbi.
Here are some tutorials for installing the Kaldi in your local machine:
In kaldi, 1 frame is 10ms. For some front work, it always like 24ms for one frame. For a workable dataset, we at least need 2000 hrs data.
1.2.1 About UTF-8
Before we really get into the world of Kaldi, we need to know the character decoding and encoding standard. So we need to know the basics of the UTF-8 & Ascii.
As we knew there can be various languages in this world other than English, we need to make it more accesible to encode and then transmit. Different countries can have different kinds of encoding and decoding standards, this can be a big burden of the communication.Thus, people created the UTF-8 to unify the standards in all of the world, so different countries do need to worry about the discontinuity of the language communication.
We can just run this before head into the shell, so we can manipulate the Chinese or any other languages’ characters in Python in linux system.
1
export PYTHONIOENCODING=utf-8
In UNIX, we can firstly check the file’s encoding format by:
1
file ../..txt
If it is UTF-16 Little Endian or other formats, we can just convert it into UTF-8 by:
1
iconv -l UTF-16LE -t UTF-8 ../.../...
Eg. there has a dir with many .txt files in UTF16 which in local/data:
Here are the standard manipulation:
1
2
3
4
5
6
7
8
9
10
11
12
13
# firstly, we make a new dir and make sure put in all the manipulated data in this dir mkdirlocal/audio_data_utf8
# then we do a loop to put all the data in local/data to local/audio_data_utf8
for x inlocal/data/*; do > y=`echo$x | sed 's|data|audio_data_utf8|'`; # > echo $y just preview the output # > done # transform all "x" utf16 files into utf8 iconv -f UTF-16LE -t UTF-8 $x > $y; done
other notes
The liux and windows files are not totally exchangeable, especially when we operate the .txt files on those two different kinds of machines.
especially we can see some codes shows the dissimilarities like: .
we can use dos2unix tool to do the convertion: After we did wget install dos2unix, then we can just do:
1
dos2unix the_file_I_want_do_conversion.txt
1.2.2 Text washing(prepare the data)
But before we launch the test, we need to firstly do the text washing.
We need to prpare the data and do the data cleaning from the data_path directory def pre_data(data_path):
1.2.2.1 Regular Expression, this is always the first step
''' This is core processing function, we mostly use Regular Expression here. Here is just a sample code, that we need to deal with: abrabic numbers, if its number, then there is no need to do segment, just replace it with space one by one.
input:"一二三五六" output:"一 二 三 五 六" '''
import re defsolve_data(): # Delete "()" # detect Chinese characters(\u4e00-\u9fa5) from a-z, A-Z, 0-9, ".". It will catch the sentences with those elements. a = re.findall('[\u4e00-\u9fa5a-zA-Z0-9 .]+', data, re.S) return" ".join(a) pass
# save the results into a new "solve_data" path defpre_data(data_path+"solve_data"): data = [] withopen(data_path, "w", encoding=utf-8) as file: # loop all the lines for line in data: file.writelines(str(line)+"\n") pass pass
After we get our target, we need to set the processing functions.
We need to enterpret the text file to phones, the tools we need is lexicon, which is just like the dictionary. So in this way, we need to segement the words, and according to our prior knowledge from our dictionary, so we can invert the segmented words into the phones. This step is typically used for the language like Chinese, since for Chinese, the word’s stop is not just like we put a space there, but we need to segment it manually. For Chinese, we mostly use Jieba to segement the sentences into words.
Here are the preview of the results should be: input:”今天是一个好日子” output:”今天 是 一个 好 日子”
1 2 3 4 5 6 7 8 9 10 11 12 13 14 15 16
import jieba
# Claim the function for segmenting defsegment_item(data): return" ".join(jieba.cut(data)) pass # After we set this function we can combine into the previous saving files. # save the file as nosegment withopen(os.join(os.path.join(save_path, "text.nosegement")), 'w', encoding = 'utf-8') as file: # loop all the lines and save it one by one. for item in text: # we firstly do the segment and then save it one by one segmet_list = segement_item(item[1]) file.writelines(item[0] + " " + segmet_list + "\n") pass
1.1.1.4 Combine into a whole processing structure
Now after we did the regular expression and jieba. We just combine them together.
data = replace_num(data) # this is just for the normal case, we just need to cut the sentences # cut the words with " " one space, and replace the " "(two spaces) into only one space. data = " ".join(jieba.cut(data)).replace(" ", " ")
# these are the needs for unusual cases, which we dealt before in the RE section, we already found out the words with those elements we want to handle with. Now, it is time for us to deal with them. If there is all numbers, so we just do not split the words, like "一二三四五". is_cut = True
# here if the scenario is TRUE, which means there is a element in there, if all are numbers it will become [True, True, True, True, True, ... True, True], in that case, it will be "is_cut" ture. Not in, is not return anymore. ''' input: 这是 学习 笔记 output: [], which is an empty list
input: 这是一本学习笔记本卖两块 output: [ Ture, True], sum this list we got 2, but not equals to the previous list length, so we do not process it.
input: 一二三四五 output: [Ture, Ture, Ture, Ture, True], sum this list we got 5, equals to the previous list length, so we process it.
'''
ifsum([Truefor item in data if item in ["零"], ["壹"], ["二"], ["三"], ["四"], ["五"]])== !len(data): is_cut = True
# here if the scenario is TRUE, not all the context are numbers. we just follow the normal way, cut it with jieba, and replace the two spaces into one space. if is_cut: data = " ".join(jieba.cut(data)).replace(" ", " ")) else: # we process those context with full numbers. ''' input: 一二三四五 output: [一 二 三 四 五] ''' data = " ".join(data) return data
pass
1 2 3 4 5 6 7 8 9 10 11 12 13
data = [] withopen(data_path, 'r', encoding = 'utf-8') as file: for line in file.readlines(): # print(line.strip("\n").strip()), preview the results to delete the '\n' together with the space. # just append the data that once processed. # bef_data here is the before data bef_data = line.strip("\n").strip() # cut the sentences into words bef_data = " ".join(jieba.cut(bef_data)) # here we input the bef_data, after processed in solve_data() function to get the processed data data.append(solve_data(bef_data)) pass pass
1 2 3 4 5
# this is a magic function if _name_== '_main_': data_path = "./.../.../" pre_data(data_path)
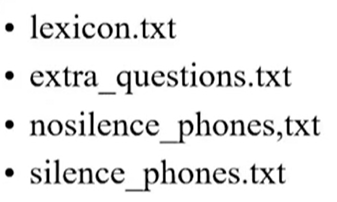
if [ $stage -le 1 ];then local/thchs-30_data_prep.sh $thchs/data_thchs30 ln -s $thchs/data_thchs30 data_thchs30 echo'###### Bookmark: language preparation ######' # prepare lexicon.txt, extra_questions.txt, nonsilence_phones.txt, optional_silence.txt, silence_phones.txt # build a large lexicon that invovles words in both the training and decoding, all in data/dict mkdir -p data/dict; cp$thchs/resource/dict/{extra_questions.txt,nonsilence_phones.txt,optional_silence.txt,silence_phones.txt} data/dict && \ cat$thchs/resource/dict/lexicon.txt $thchs/data_thchs30/lm_word/lexicon.txt | \ grep -v '<s>' | grep -v '</s>' | sort -u > data/dict/lexicon.txt
echo'###### Bookmark: language processing ######' # generate language stuff used for training # also lexicon to L_disambig.fst for graph making in local/thchs-30_decode.sh mkdir -p data/lang; utils/prepare_lang.sh --position_dependent_phones false data/dict "<SPOKEN_NOISE>" data/local/lang data/lang fi
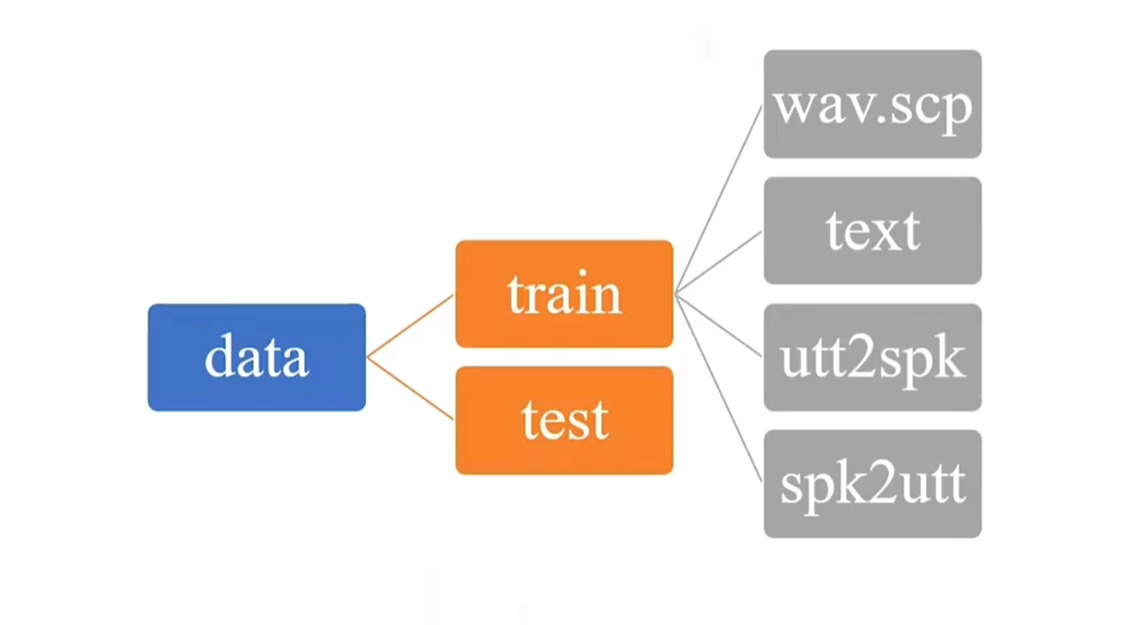
1.2.1 Step 1. Prepare $Train Files
For building those four elements, we need 4 files: 1. wav.scp, 2. text, 3. utt2spk, 4. spk2utt.
import os #The location of the audio directory target_dir = './../../' save_path = './../../'
# Loop all the audio resources wav_scp = [] for file_name in os.listdir(target_dir): # Append all the .wav file into the list if file_name[-3:0] == ".wav": # Here we use "." to split the file_name and use join to combine our directory address. We also can use "os.path.join(target_dir + filename)". wav_scp.append([file_name.split(".")[0], os.path.join(target_dir, filename)]) pass pass # we can check the output by print(wav_scp) # Save wav_scp withopen(os.path.join(save_path, wav.scp), 'w', encoding = 'utf-8') as file: # Loop all the items in wav.scp and save them one by one for item in wav.scp: file.writelines(item[0]+" "+item[1]+"\n") #Our output format should be: filename target_dir filename pass pass
The last step can be sorting the file name by vim:
# find all the wav_files name and their dir find './../../' -iname '*.wav' # use find we can list all the .wav files' name, the "i" in "-iname" means not caring the upper or lower case of the characters.
#we can check it by printing the first line find './../../' -iname '*.wav' | head -n 1
# then we can save the .wav file list into a temp place find './../../' -iname '*.wav' > wav.scp.temp
# now we already got all the uttpath, but we still need the uttid
cat wav.scp.temp | awk - F '/''{printf("%s_%s\n", $(NF-1), $NF)} '|sed 's|.wav||' > wav_id # here we are using sed to remove all the ".wav" strings into " " || means "", which is empty space
# we only need to combine the wav.scp.temp and wav_id, since there are all in great orders, so we can just do: # preview the data: paste -d' ' wav_id wav.scp.temp | head -n 1 paste -d' ' wav_id wav.scp.temp > wav.scp # now we can get all the wav.scp
import os ''' From AUDIOSPK1001.txt get ID and "I Love Kaldi"
AUDIOSPK1001 I Love Kaldi AUDIOSPK1002 Me too ''' target_dir = "./.../.../" # This is the stored text file
save_path = "./.../.../" text = []
# loop all the text file name in directory for filename in os.listdir(target_dir): # only operate the file that ends with ".txt" if filename[-4:] != ".txt": continue
# read the file withopen(os.path.join(target_dir, filename), 'r', encoding="utf-8")as file: # read line by line for line in file.readlines(): # Delete all "\n" and the the space line = line.strip("\n").strip() # print(line.strip("\n")), we can print the text files all in one screen without the \n symbols.
# Get the filename with its contents text.append([filename.split(".")[0], line])
pass pass pass
# save the file as nosegment withopen(os.join(os.path.join(save_path, "text.nosegement")), 'w', encoding = 'utf-8') as file: # loop all the lines and save it one by one. for item in text: file.writelines(item[0] + " " + item[1] + "\n") pass
print(text)
At the same time, here are the UNIX way:
we need to get the format like SPK_ID WAV_PATH
#AUDIOSPK1001 I Love Kaldi #AUDIOSPK1002 Me too
Here we just create a .sh file called generate_text_id.sh
1 2 3 4 5
#! /bin/bash spk_id = $1#$1 is your first variable
exit 0;
Then we need to make it into a runable file:
1
chmod +x generate_text_id.sh
And then we can run it again:
1 2 3
./generate_text_id.sh SPK.txt # it will just print itself SPK.txt
1 2 3 4 5 6 7
#! /bin/bash spk_id = $1#$1 is your first variable
# echo spk_id, this will just print the first column awk {printf("%s %s\n", $spk_id, $1)}' $spk_id
import os # The path of the audio resources path_dir = "./.../.../"
# The final output path save_path = "./.../.../"
# Save the final results defsave_data(data, file_name): withopen(os.path.join(target_file, file_name), 'w', encoding = "utf-8") as file: for item in data: # save the item line in line file.writelines(item) pass pass pass ''' Audio file name: AUDIOSPK1001.wav
AUDIOSPK1001 SPK1 ''' defget_utt2spk(): # For saving the final results utt2spk = [] # loop all the directories for file_name in os.listdir(path_dir): # if the file itself is .wav file, we operate, others dismiss if file_name[-4:] == ".wav":
# Audio ID utt = file_name.split(".")[0] # SPK ID spk = utt[-7:-5]
# Print(utt+ " " + spk + "\n") # Add into utt2spk utt2spk.append(utt + " " + spk + "\n") pass pass # save the data save_data(utt2spk, "utt2spk")
# set the function to get spk2utt ''' Audio file name: AUDIOSPK1001.wav
defget_spk2utt(): spk2utt = {} for file_name in os.listdir(path_dir): # Delete a file if file_name[-4:0] == ".txt": continue # audio ID utt = file_name.split(".")[0] # SPK ID spk = utt[-7:-5]
# If there has a SPK here, we just append if spk in spk2utt: spk2utt[spk].append(utt) # If there not have a SPK here, we just preset it as a list. else: spk2utt[spk] = [] pass
# using print(spk2utt) to check
# final output list from the dict write_spk2utt = [] for key in spk2utt.keys(): write_spk2utt.append(str(key)+" ".join(spk2utt(key))+"\n") ''' list = ["A", "B", "C", "D"] print(" ".join(list)) ------------------------------------------------------ A B C D ''' pass # save the output save_data(write_spk2utt, "spk2utt") pass
get_spk2utt() get_utt2spk()
The difference between the utt2spk and the spk2utt is that, for utt2spk, there is only one-to-one relations instead of like spk2utt, there are one-to-multiple relation. So, in most cases, we only need either 3 or 4, because if we already got one, another one is also can be derived.
1.2.2 Step 2. Prepare $Dict/Dictionary
Dictionary this is the dict file we need to manipulate, in dict directory. The dict folder can contain these files that we needed:
We need to get the ```lexicon.txt``` by running ```get_lexicon.py```.
We need two kinds of dictionaries. 1st. the ```lexicon.txt``` from the corpus to better train a ```n-gram``` model, in some words, the language model. 2st. the word-to-phones, we also need a reference lists from there, we need acoustic model. In this case, so we need a "BIG" dictionary.
In this step, we need to transform the words into phones, so we can align the words and train them.
```python ''' This is the dictionary mostly for the acoustic training needs. 去年 q v4 n ian2 上去 sh ang4 q v4 上去 sh ang4 q v5
''' def get_lexicon(data_path):
# set can reduce the duplications. The dictionary must be just a set. lexicon = set() with open("data_path", "w", encoding = "utf-8") as file: for line in file.readlines(): #print(line.strip("\n").strip().split(" ")), remove the \n and cut with the identifier from the SPACE " " [lexicon.add(item) for item in line.strip("\n").strip().split(" ")] ''' input: 这是一本学习笔记本卖两块 output: [这是,一本, 学习, 笔记本, 卖, 两块], '''
pass pass #print(lexicon) # save the lexicon with open("../.../lexicon.txt", "w", encoding = "utf-8") as file: for item in lexicon: file.writelines(item + "\n") # here are the estimated results. ''' 去年 上去 上去 一 笔记本 卖 ''' pass pass pass
get_lexicon("./.../temp")
phone.txt/nonsilence_phones.txt : all the phones
silence_phones.txt : SIL
extra_questions.txt
The meaning of the extra_questions.txt is to distinguistise the same pronunication with difference tones. This is very important for some tonal languages like Mandarin or Thai…
```phone``` is a directory, it will help the decision tree to get the clusters.
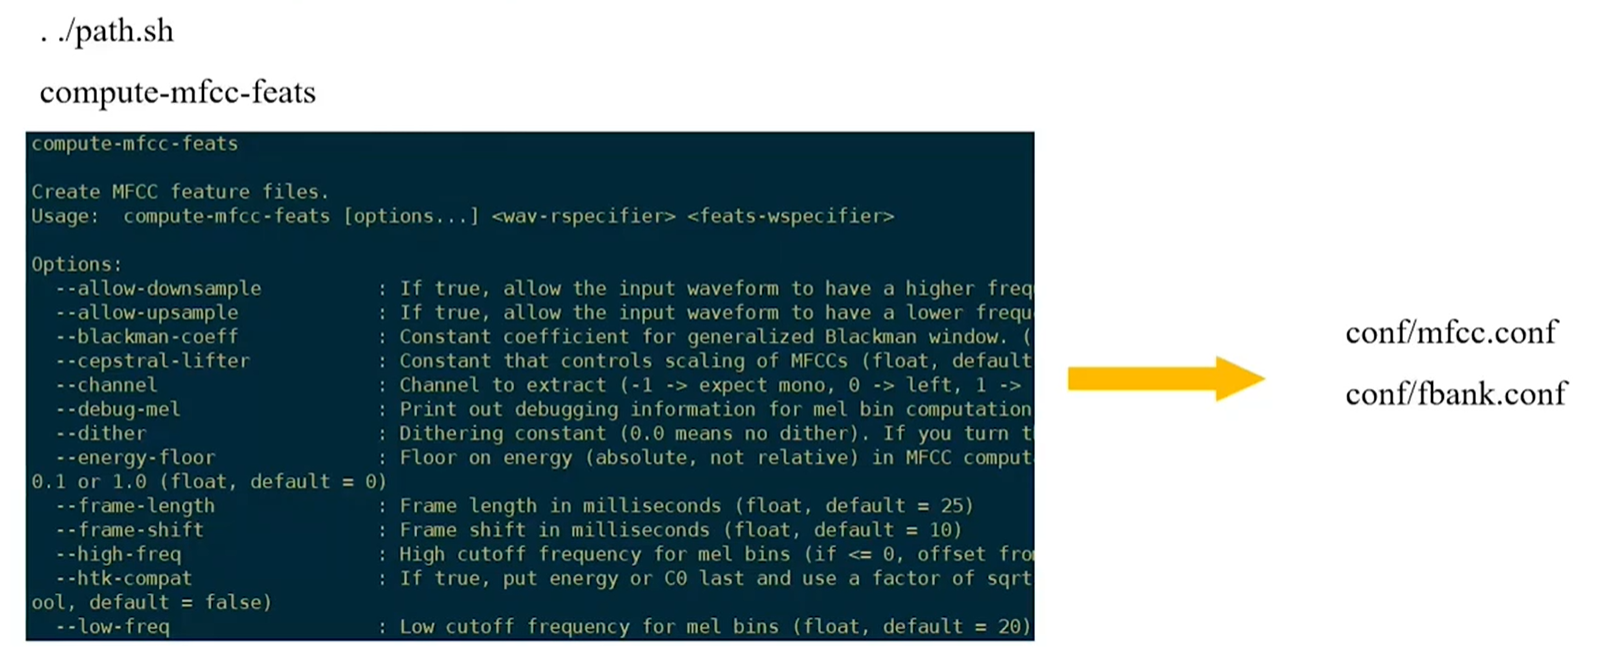
## 1.4 Acoustic Feature Extractions
We can have the MFCC feature as well as the ```Fbank``` feature. MFCC is in ```13D```, and ```Fbank``` is ```40D```.
```sh if [ $stage -le 2 ];then echo '###### Bookmark: feature extraction ######' # produce MFCC and Fbank features in data/{mfcc,fbank}/{train,test} rm -rf data/mfcc && mkdir -p data/mfcc && cp -r data/{train,test} data/mfcc rm -rf data/fbank && mkdir -p data/fbank && cp -r data/{train,test} data/fbank for x in train test; do # make mfcc and fbank steps/make_mfcc.sh --nj $n --cmd "$train_cmd" data/mfcc/$x steps/make_fbank.sh --nj $n --cmd "$train_cmd" data/fbank/$x # compute cmvn for mfcc and fbank steps/compute_cmvn_stats.sh data/mfcc/$x steps/compute_cmvn_stats.sh data/fbank/$x done fi
The output files in ```data/mfcc/train`` can be:
1 2 3 4 5 6 7
utt2dur: the duration ofeach audio file frame_shift: the frame shit utt2num_frames: the frame numberofthe speech feats.scp: the feature id cmvn.scp: the cmvn id data: the feature storage path log: thelogfile
MFCC in mostly is used in GMM training, and Fbank used in DNN training, but also there has some experiments to use the high level MFCC features to train the DNN.
Here is the MFCC computing scripts. We can use like allow-downsample or allow-up-sample to help us to do some over or down sampling operations.
if [ $stage -le 3 ];then echo'###### Bookmark: GMM-HMM training ######' # monophone # we will train the monophone here. steps/train_mono.sh --boost-silence 1.25 --nj $n --cmd "$train_cmd" data/mfcc/train data/lang exp/mono # monophone ali # we will align the monophone to train a GMM-HMM model once again steps/align_si.sh --boost-silence 1.25 --nj $n --cmd "$train_cmd" data/mfcc/train data/lang exp/mono exp/mono_ali
# the 1.25 here is the default param for setting the silent phone.
# triphone # we will train the monophone here steps/train_deltas.sh --boost-silence 1.25 --cmd "$train_cmd" 2000 10000 data/mfcc/train data/lang exp/mono_ali exp/tri1 # triphone_ali # we will align the triphone to train a GMM-HMM model once again steps/align_si.sh --nj $n --cmd "$train_cmd" data/mfcc/train data/lang exp/tri1 exp/tri1_ali
# lda_mllt # we will use the lda_mllt model to do the trainning steps/train_lda_mllt.sh --cmd "$train_cmd" --splice-opts "--left-context=3 --right-context=3" 2500 15000 data/mfcc/train data/lang exp/tri1_ali exp/tri2b # lda_mllt_ali # realign and retrain steps/align_si.sh --nj $n --cmd "$train_cmd" --use-graphs true data/mfcc/train data/lang exp/tri2b exp/tri2b_ali
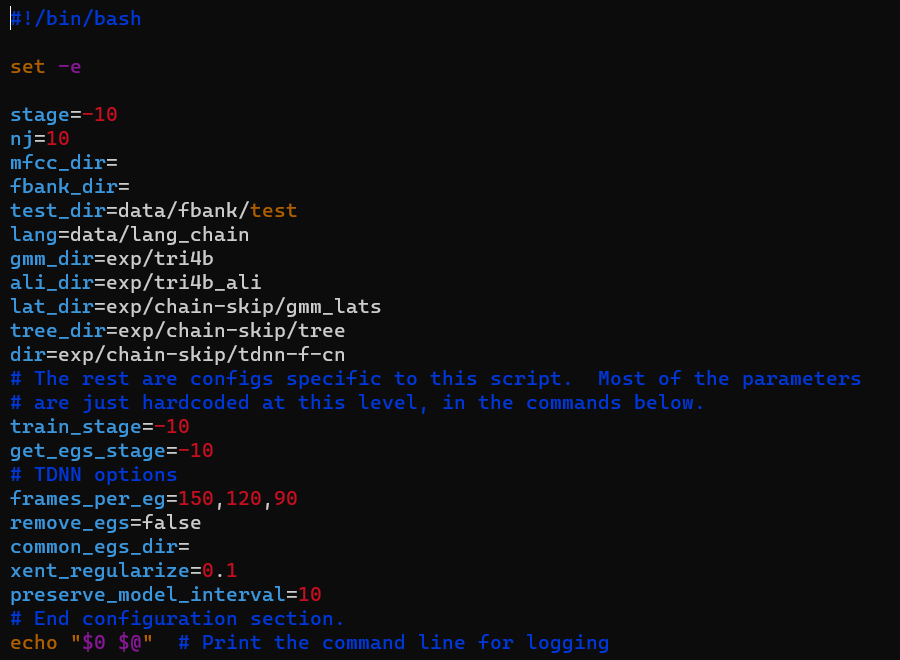
Here we will use the TDNN-F (Time Delay Neural Networks Factor) as an example. There are three steps for us to handle this procedure:
1 2 3 4 5 6
if [ $stage -le 4 ];then echo'###### Bookmark: TDNN-F Chain Training ######' local/chain/run_tdnn-f_common_skip.sh \ --mfcc-dir data/mfcc/train --fbank-dir data/fbank/train \ --gmm-dir exp/tri4b --ali-dir exp/tri4b_ali fi
Here are the preview of the run_tdnn-f_common_skip.sh .
1.6.1 Declare the Parameters
The first step if to declare the parameters.
There are some key parameters:
1 2 3 4
lat_dir: the dir to store the lattice tree_dir: the dir to store the chain-tree frames_per_eg: how many frames ineach egs, in here it can be 150, 120or90 xent_regularize: cross entropy regularization params
1.6.2 Chain Modeling
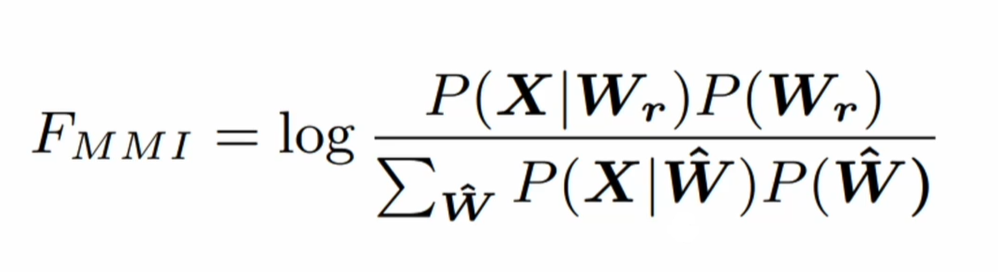
This equation shows how we optimize the sequence objects:
$$ X : Speech \ Data \ W_{r}: The \ real \ transcriptions \ \hat{W}: All \ the \ possible \ sequences $$ If we look this into anther way, this equation could be: $$ F_{MMI} = log \frac{lattice}{alignment} $$
in Kaldi, the concept of it is to get the ```one best sequeces``` from different phones at each frame, we dont focus on **each frame's phone** is what, we only care about whether it is more reasonable. So that is the main difference that compared with the pure DNN. **Phones -> Word**
There are three core scripts from the ```run_chain_common.sh```:
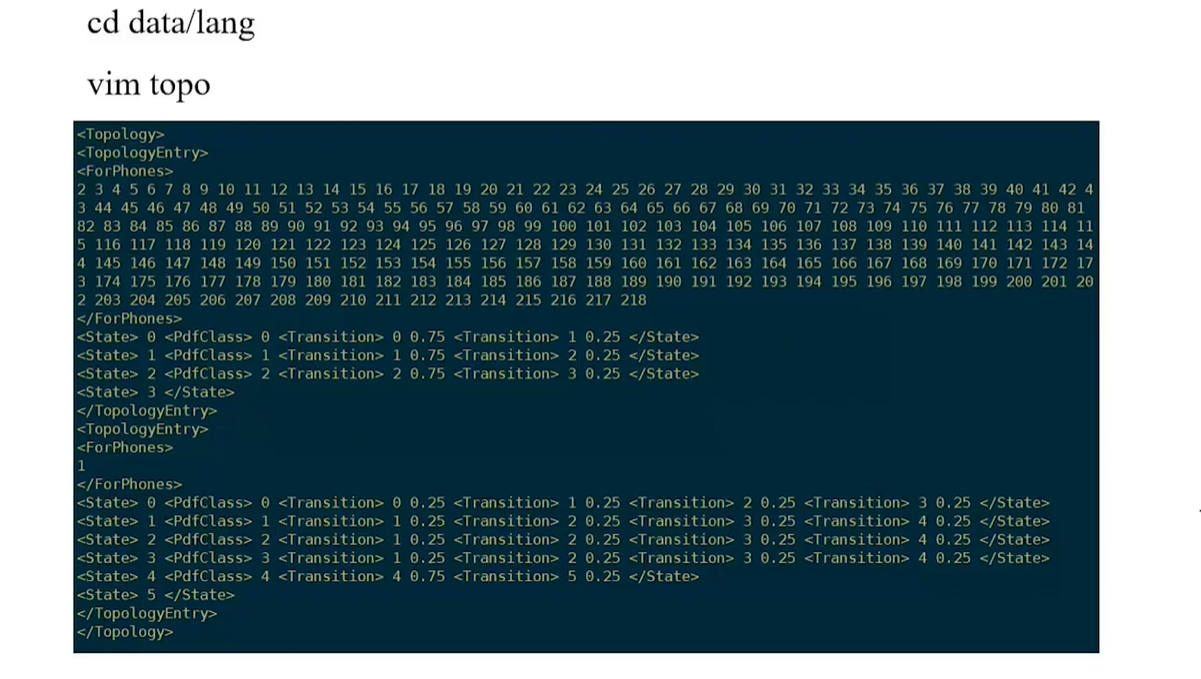
```1. steps/nnet3/chain/gen_topo.py```: It will generate the ```topo``` form files, it has relations with the ```lang``` files. Here are the preview of it.
The upper one is the preview of the common/traditional DNN topo files, the lower one is the ```train``` model generated the new topo files. So as we can see, the second topo files is more **neat**, its in the ```src/hmm-topology.cc``` which is called ```chain TOPO```. The essence in here is to speed up the tranning and decoding efficiency, since this is why we need a more neat ```TOPO``` structure. In the ```chain TOPO``` structure, we only need 1 frame, but in the traditional structure, we need 3 frames, this enables us to do the ```frame subsampling```!

But also, the ```chain TOPO``` also got a problem like ```over-fitting```. There are three ways to solve the overfitting problem:
1. xent_regularize: cross entropy regularization
2. Chain loss & L2 norms
3. Use leaky HMM factor
```2. steps/align_fmllr_lats.sh```: This will generate the lattice ```lat_dir/lat.*.gz``` and alignment ```lat_dir/ali.*.gz```.
Here is the previews of ```lat_dir/ali.*.gz```, it will show **each frames corresponds to each phone**, so it is the **frame -> pdf/ phones**. This will be a core part of the **lattice!!!**.
Here are the preview of the ```lattice```: Here, the ```0``` node can be the ```Node id1```, the ```1``` node can be ```Node id2```, the output will be the ```word id```, the cost can be the sum of ```AM score``` + ```LM score```, the ```transid 1-A``` means the word frame length is from 1~A. It can be a very informative ```alignment files```. The input is the ```transid 1-A```, output will be the ```word id```.
```3. steps/nnet3/chain/build_tree.sh```: The output will be a new ```tree_dir/tree```. Here is the preview of the decision tree:
The ```linear_opts``` is the core param of the ```TDNN-F```, if without this param it will only be the ``TDNN`` model without ```f```. As shown from the code,. it will apply in the whole ```layer trainning```.
The train step is very similar to the most of the DNN trainnings, the difference is that it will generate the ```phone_lm``` and ```den(denominator).fst```.
# 2. Language Model and Decoding: WFST "The Big Four"
From the last chapter we already knew ```HCLG.fst``` includes ```H.fst```, ```C.fst```, ```L.fst```, ```G.fs```. Here is a tutorial doc from: https://nadirapovey.blogspot.com/2021/12/what-is-hclgfst.html to explain what is HCLG.
Here are the flowchart: from ```acoustic characteristics ---> phones ---> words ---> sentences```.
```H.fst``` enables us to input the acoustics characteritics and return the phone.
**L.fst enables us to input phones to word.**
How to get those four files can be the core idea of the kaldi ASR system. The ASR detection logic can be: ```acoustic features --> H.fst --> phones C.fst --> L.fst + G.fst (linguistics) --> words```.
## 2.1 H.fst (HMM States)
For H.fst, what we want is input the acoustic characteristics, output pdf/phones.
### 2.1.1 Make MFCC
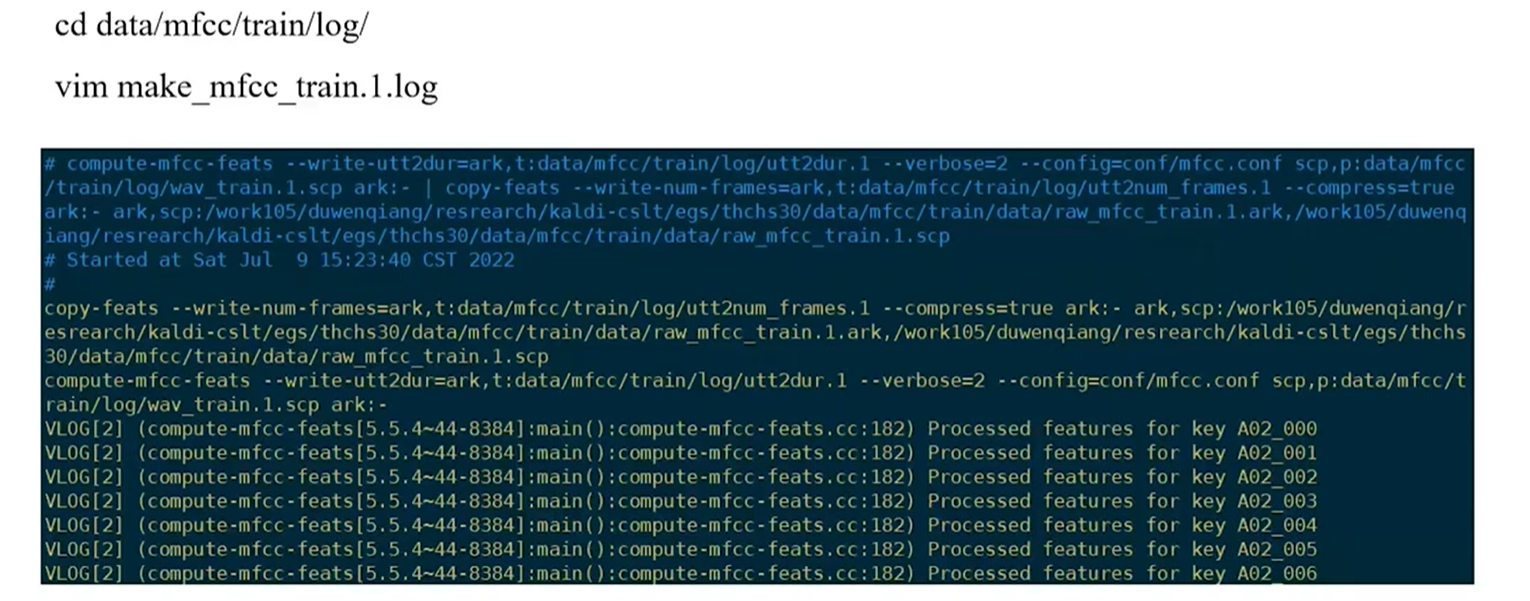
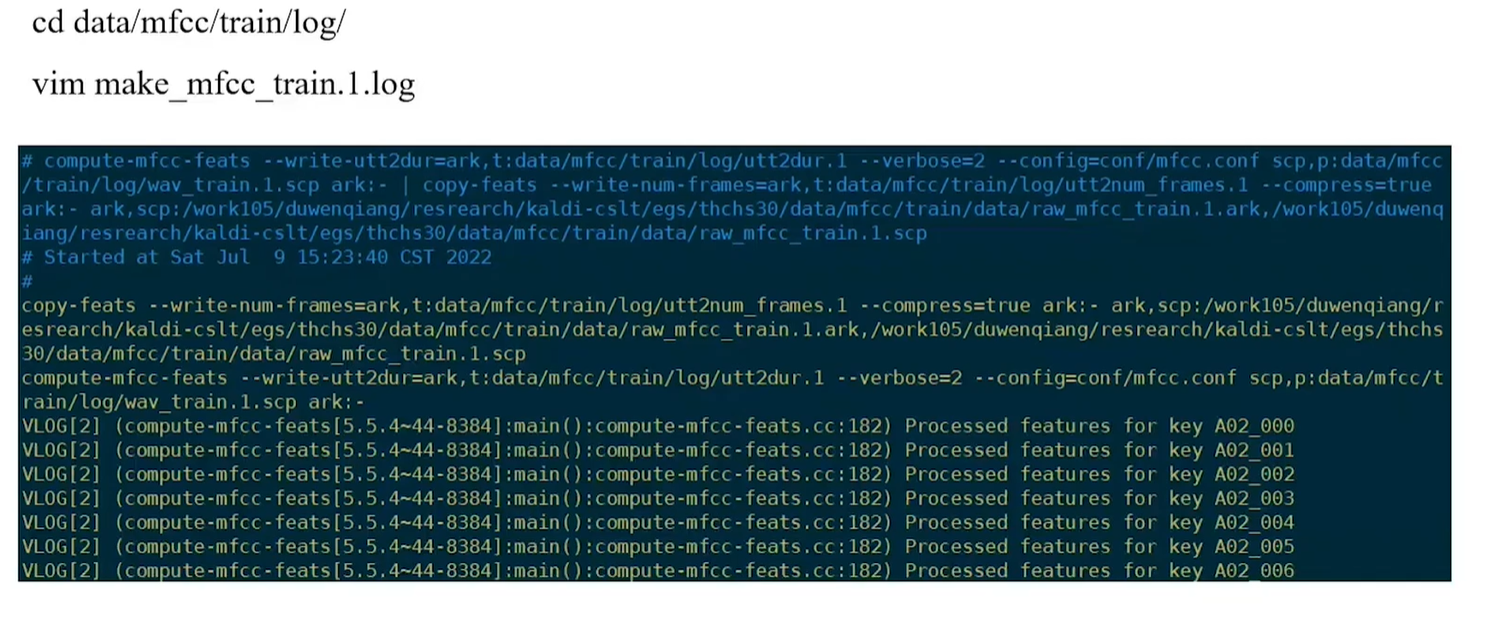
After we run this script below, the Kaldi will automatically generate 7 files:
The significance of this file is to tell us where the MFCC will be stored. All the MFCC features will be stored at AWK formats. AWK is binary forms, because it will save the space.
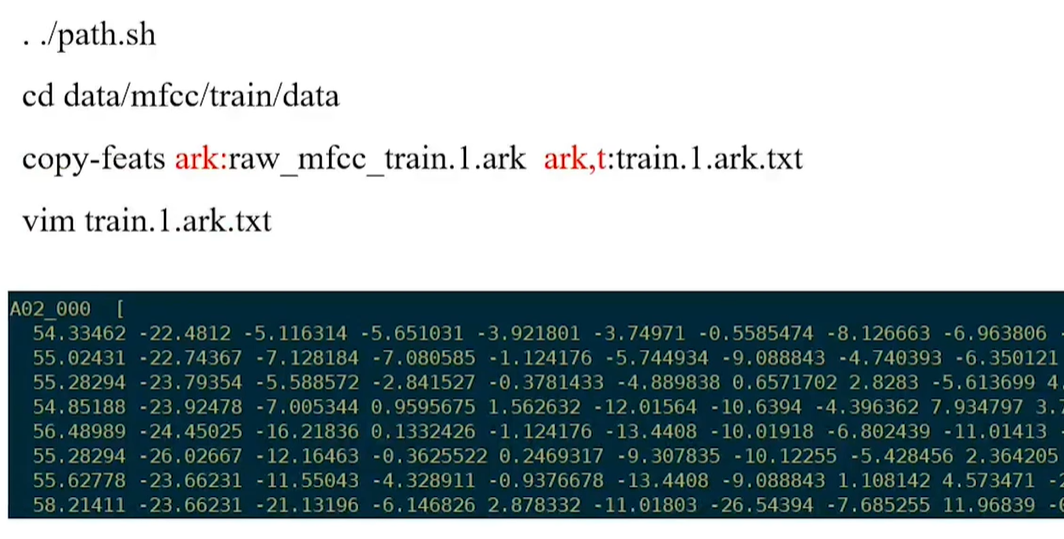
This is the preview of 13th MFCC:
AUDIO_ID
1 2 3 4 5
[54.32323 -12.8887 -2.122123.2322 ... -2.323232 #13th features for each frame
4.323323 -11.5887 -3.123128.2422 ... -4.323239
5.332324 -10.8877 -6.4422123.2322 ... -7.223132 ]
2.1.1.2 frame_shift
The frame shift is just a param told us the frame shift time, if it is 10ms, then it will print 0.01, since 10ms = 0.01s.
2.1.1.3 utt2dur
This will show us every audio files’ durations.
AUDIO_FILE_ID #Durations (s)
2.1.1.4 utt2num_frames
This will told us every audio files’ frame numbers. Since we already know frame_shift time is 0.01s. Which means for every frame it needs 0.01s.
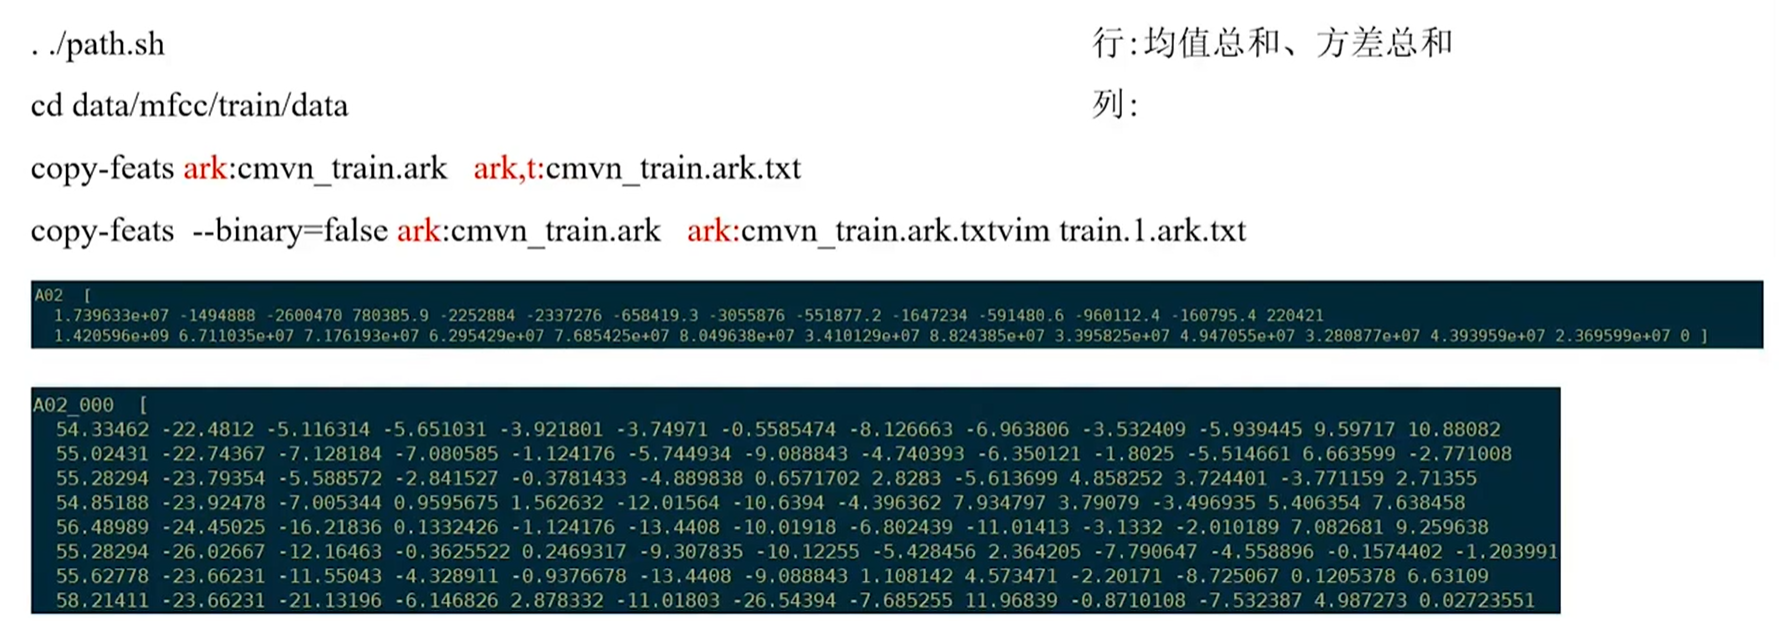
Here is how we visualize the ark file into the txt. After that we can preview the cmvn_ark.txt file.
2.1.2 CMVN
This operation is for solving one problem which is that we need to take into the different people’s diversities. Since we knew that for different people have different timbre. CMVN is for solving this problem.
1
egs/wsj/steps/compute_cmvn_stats.sh <data_dir>
The following is where the CMVN tool belongs to.
1
steps/compute_cmvn_stats.sh ./kaldi_file
Here we generated the CMVN in the kaldi_file directory.
After we visualized the .ark file from the kaidi_file directory to preview the .txt file.
We can know that for each frame, there have 13D MFCC params, so if we need to do CMVN, we need to caculate 2 params for each frame. So there will be every column has two params: average and variation. So there had 13 columns, so for each column we need 13*2 = 26 CMVN params, which consists 13 averg and 13 var.
If we do not caring about the SPK, just focus on the audio content itslelf will be a big issue. Since as we know, we do need know the spk’s voice characteristics and this will affect our trainings,we need to take that bias into it. We will do “CMVN” here, this will be applied for prior distribution for male and female. The value between the “CMVN” is [0-1].
2.1.3 Generate H.fst
After we got CMVN, we already can generate the H.fst file.
2.1.4 Check Log
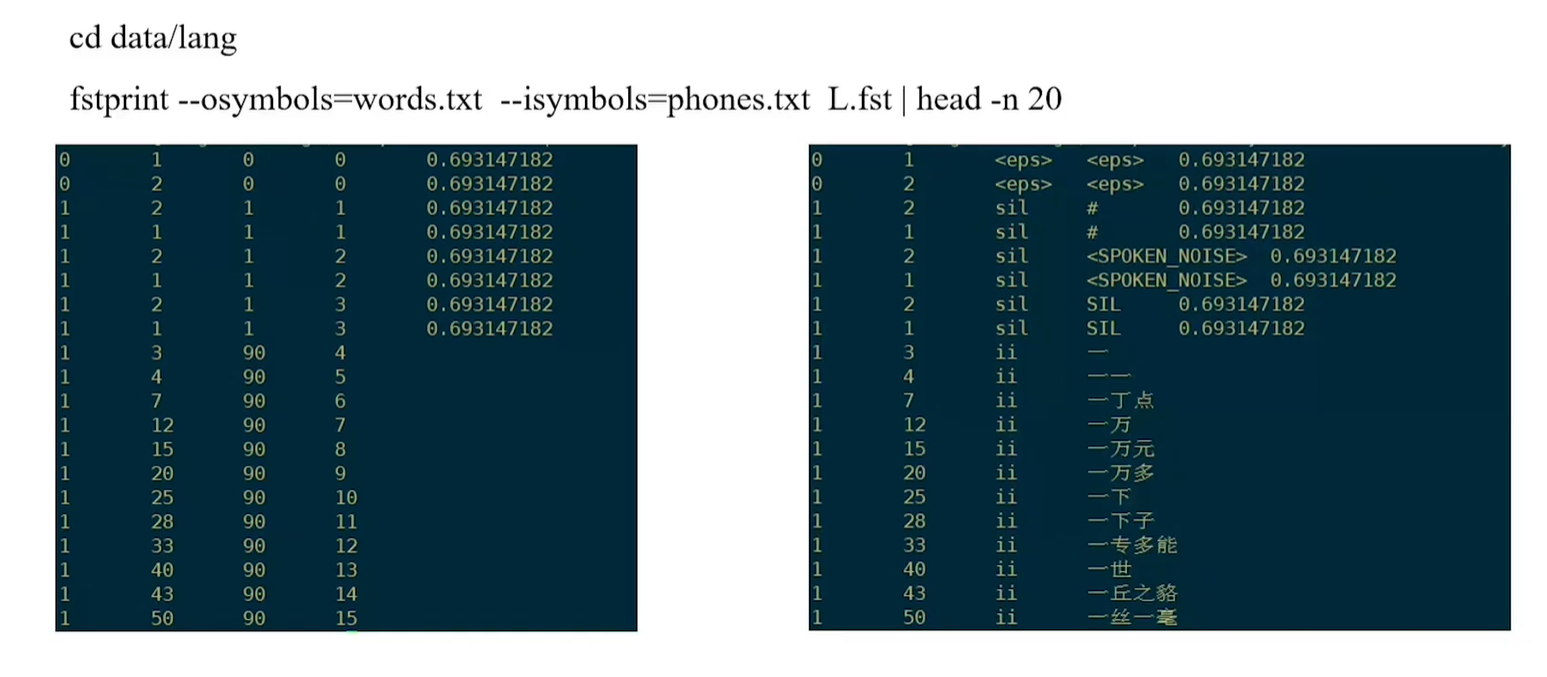
2.2 L.fst (Lexicon/Dictionary)
We input phones and output words.
Generate run.sh & get L.fst
The final step should be write a run.sh file to generate the L.fst file.
1 2 3 4 5 6 7 8 9 10 11 12
# 1. generate the L.fst
# here we used prepare_lang.sh # there are four params we input:
# 1. the four files we prepared, fix_data_dir.sh ./local/dict # 2. If there has the phones not in the dictionary, what it will be recognized as 'SIL' # 3. the temp files # 4. F.fst
Here we just introduce UNIX way to do it. We will use awk.
is very fast then python, if there is efficiency needs.
1 2 3 4 5 6 7 8 9 10 11 12 13 14 15
```Python # get the corpus input we need to process file_name = '/root/data/.../...'
# read the file with open(file_name, 'r', encoding = 'utf-8') as file: for item in file.readlines(): print(" ".join(item.strip("\n")strip().split(" ")[1:])) pass pass
# we can just get [word1, word2, word3, ..., wordn]
We will use the AWK to do the same thing.
1 2 3 4 5 6 7 8 9
# here are the original idea #[AUDIOSPK1001 'I, Love, Kaldi'] #[AUDIOSPK1001 'Me, too'] # we can just firstly test it with print in awk awk '{print $1}' text # here "text" means the txt file you want to manipulate, her is $1 means we print the first colum. It will look like: # AUDIOSPK1001 # AUDIOSPK1002
# If is $0, which means the whole. $2 means the second column. $4 is the fourth column.
Here we need to get the column that except the first column.
1 2 3 4 5 6 7
awk '{for(i=2; i<NF; i++) printf $i "\t"; printf '\n'}' text # here the \t is just like \n, we can delete it as well. the default diving symbol is ' ', in here actually awk -F ' ''{for(i=2; i<NF; i++) printf $i "\t"; printf '\n'}' text. NF is the last column, awk is based on column manipulations.
awk '{for(i=2; i<NF; i++) printf $i ""; printf '\n'}' text # we will get exactly the same output just like python, but much faster: # word1, word2, word3, ..., wordn # I, Love, Kaldi # Me, too
2.4.1 write get_lm.sh (we need to write aw shell script to run and get th lm(language model))
language model is statistical language model, more tranning data can be more "better" in some ways.
```Bash # You need firstly specify your corpus sources. text = "./text.lm" # 1. get all the corpus # awk '{for(i=2; i<NF; i++) printf $i ""; printf '\n'}' text > xxx.lm # loop all the columns: # NF here means the last column # printf just like C language, they are the same in some ways # 2. Deploy Trigram n-gram model ngram-count -text text.lm -order 3 write train.part.txt.count # OR we can use ngram-count -text $text -order 3 write train.part.txt.count # $text means the file itself, we already defined it at first. # -text: the corpus # wirte: write the file # here 3 means tri, which indicates triphone, and write into train.part.txt.count file. # here are the preview
# word pairs times # I 10 # I Love 5 # I Love Kaldi 1 # Hello World </s> 2 # </s> is great 1 # </s> means the starting or ending point, usually means something will begin or end from there.
# 3. From the 2nd step, generateing the lm ngram-count -read train.part.txt.count -order 3 -lm LM -interpole -kndiscount # -lm which means the generated Language Model, right now we call it LM # -interpole is the smoothing function, and kndiscount is the callback function.There are two possibilities, one is the original and other which is callback function. # \data\ # ngram 1 = 2821 , here means there are 2821 1grams' pairs # ngram 2 = 6344 # ngram 3 = 444 # \1-grams: # -3.4234324 1 -0.034523532 this is also probabities but with log(), we call backoff method # -3.4234224 2 -0.032323532 # -2.3234224 A -0.023233532 # \2-grams: # -3.2424432 I Love -0.232312332 # \3-grams: # -4.3244343 I Love Kaldi -0.454554545
In Kaldi, we decode the HCLG.fst, HCLG is just a kind of fst graph, it will use the Viterbi to decode. That is the easiest way to decode the fst model.
5.1 GMM-latgen-faster Decoder
We can use the default decoder to decode the files. GMM-latgen-faster decoder can be thought as one type of LatticeSimpleDecoder.
# this is the basic params it need steps/decode.sh [option] <graph-dir> <data-dir> <decode-dir> # <graph-dir> is the HCLG.fst # <data-dir> is the data files needed to be decode # <decode-dir> is the results Kaldi ASR should output
After the Kaldi did the decoding, it will calculate WER (1-ER) for us.
5.2 Simple Decoder
Decoder```: If we would like to use the ```gmm-decode-simple```, we need to follow the following scripts:
1 2 3 4 5 6 7 8 9 10 11 12 13
```sh model=".../final.mdl" # we need to specify the hclg= ".../HCLG.fst" feats= "cmvn.scp" # the acoustics fatures out= "." # the output file
# we need to apply the cmvn into the acoustic features: feats.scp apply-cmvn --utt2spk=ark:${feats}/utt2spk scp:${feats}/cmvn.scp scp:${feats}/feats.scp ark, t:- |add-deltas ark:- ark:feats_cmvn_delta.ark
In this part we will download and train a complete kaldi ASR demo from installation to decoding. Since the installation of kaldi is too big and also there has a lot of submodules we do not really need. So in this case, we just do some file modifications, we just make a mini-version in order to better understand the kaldi workflow and study.
Firstly, we need to download the kaldi demo from the git:
1 2 3 4
git clone https://github.com/xiao11lam/kaldi_tutorials.git cd kaldi_tutorials # change the write and read privilege chmod -R 755 ./*
Here is a repo only for the tutorial purposes, since we have manipulated some files from the original Kaldi in order to make the installation and training process more friendly.
And remember before you start to make this demo, please make sure you already have the cuda installed!!!.
Check the CPU info, to find out how many processors your PC have.
1
grep 'processor' /proc/cpuinfo | sort -u | wc -l
Now I got 8.
1 2 3
cd /mnt/c/Users/ABC/Desktop/kaldi-cslt/tools vim run.sh # check the env installation scripts sh run.sh # we can just run the scripts and let it automatically install
Here are the preview of the run.sh
1 2 3 4 5 6 7 8
# here you can spefify your CPU info make -j 8 # install the IRSTLM ./extras/install_irstlm.sh # The env.sh is not under tools/extras/. It is under tools/.So you need to change the environmental variable. source env.sh # install the openblas ./extras/install_openblas.sh
2. Set the Src Environment
Here, we follow the same way to install these src environments.
1 2 3
cd /mnt/c/Users/ABC/Desktop/kaldi-cslt/src vim run.sh # modify the run.sh file if you want (optional) sh run.sh
# Copyright 2016 Tsinghua University (Author: Dong Wang, Xuewei Zhang) # 2018 Tsinghua University (Author: Zhiyuan Tang) # 2019 Tsinghua University (Author: Wenqiang Du) # 2022 Sirui Li Zixi Yan # Apache 2.0.
. ./cmd.sh ## You'll want to change cmd.sh to something that will work on your system. ## This relates to the queue. . ./path.sh
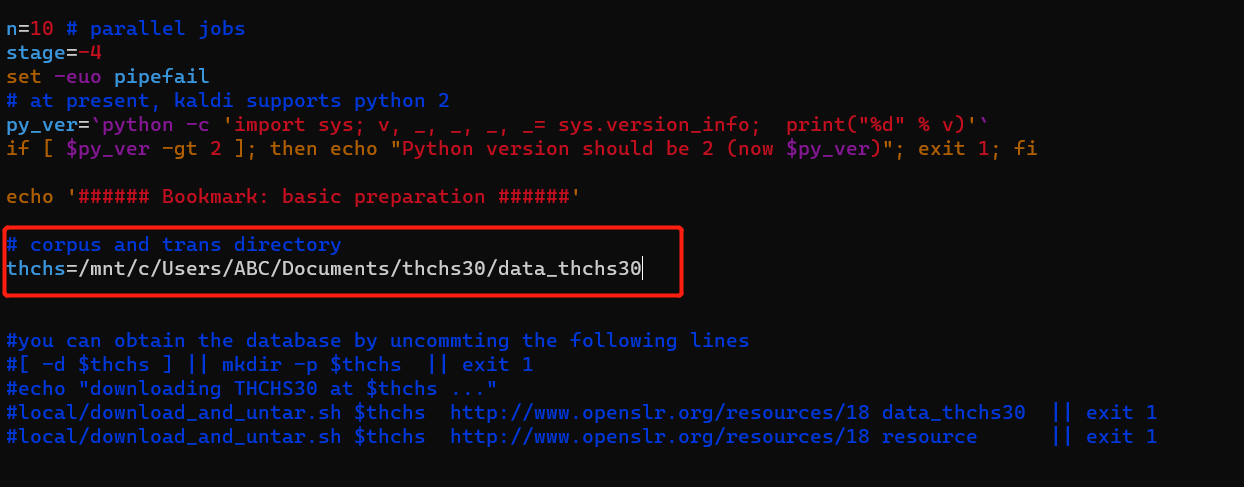
n=10 # parallel jobs stage=-4 set -euo pipefail # This command sets any pipeline command to stop if there is an error or an undefined method variable. # at present, kaldi supports python 2 py_ver=`python -c 'import sys; v, _, _, _, _= sys.version_info; print("%d" % v)'` if [ $py_ver -gt 2 ]; thenecho"Python version should be 2 (now $py_ver)"; exit 1; fi
echo'###### Bookmark: basic preparation ######'
# corpus and trans directory thchs=/work105/duwenqiang/data/ # Data path, the path where the downloaded thchs data archive will be stored after decompression
#you can obtain the database by uncommting the following lines #[ -d $thchs ] || mkdir -p $thchs || exit 1 #echo "downloading THCHS30 at $thchs ..." #local/download_and_untar.sh $thchs http://www.openslr.org/resources/18 data_thchs30 || exit 1 #local/download_and_untar.sh $thchs http://www.openslr.org/resources/18 resource || exit 1
if [ $stage -le 1 ];then local/thchs-30_data_prep.sh $thchs/data_thchs30 #This is the code written for thchs30 data, can not be directly applied to other data, the scripts in the local folder are prepared for the current data, not applicable to other data
ln -s $thchs/data_thchs30 data_thchs30 #This is a soft link to call the language model in the folder later echo'###### Bookmark: language preparation ######' # prepare lexicon.txt, extra_questions.txt, nonsilence_phones.txt, optional_silence.txt, silence_phones.txt # build a large lexicon that invovles words in both the training and decoding, all in data/dict mkdir -p data/dict; cp$thchs/resource/dict/{extra_questions.txt,nonsilence_phones.txt,optional_silence.txt,silence_phones.txt} data/dict && \ cat$thchs/resource/dict/lexicon.txt $thchs/data_thchs30/lm_word/lexicon.txt | \ grep -v '<s>' | grep -v '</s>' | sort -u > data/dict/lexicon.txt
echo'###### Bookmark: language processing ######' # generate language stuff used for training # also lexicon to L_disambig.fst for graph making in local/thchs-30_decode.sh mkdir -p data/lang; utils/prepare_lang.sh --position_dependent_phones false data/dict "<SPOKEN_NOISE>" data/local/lang data/lang
fi
if [ $stage -le 2 ];then echo'###### Bookmark: feature extraction ######' # produce MFCC and Fbank features in data/{mfcc,fbank}/{train,test} rm -rf data/mfcc && mkdir -p data/mfcc && cp -r data/{train,test} data/mfcc rm -rf data/fbank && mkdir -p data/fbank && cp -r data/{train,test} data/fbank for x in train test; do # make mfcc and fbank steps/make_mfcc.sh --nj $n --cmd "$train_cmd" data/mfcc/$x # extract mfcc features --nj is how many threads to use to extract features, the number of threads should be less than the number of lines in spk2utt steps/make_fbank.sh --nj $n --cmd "$train_cmd" data/fbank/$x #Extraction of fbank features # compute cmvn steps/compute_cmvn_stats.sh data/mfcc/$x#The mean and variance of mfcc features are done, and the mean-variance can improve the performance of the model to some extent. steps/compute_cmvn_stats.sh data/fbank/$x done fi
if [ $stage -le 3 ];then echo'###### Bookmark: GMM-HMM training ######' # monophone # Train the monophonic model, this step will generate a model file of num.mdl under exp/mono/ when completed and link the final generated num.mdl to final.mdl. steps/train_mono.sh --boost-silence 1.25 --nj $n --cmd "$train_cmd" data/mfcc/train data/lang exp/mono # monophone ali steps/align_si.sh --boost-silence 1.25 --nj $n --cmd "$train_cmd" data/mfcc/train data/lang exp/mono exp/mono_ali
# triphone #Training the three-phoneme model. #2000 10000 specify the number of states and Gaussians respectively #input is data/mfcc/train data/lang exp/mono_ali, training data, lang files, alignment files #output is stored in tri1, mainly mdl model files and some alignment files steps/train_deltas.sh --boost-silence 1.25 --cmd "$train_cmd" 2000 10000 data/mfcc/train data/lang exp/mono_ali exp/tri1 # triphone_ali #Caculate the alignment info steps/align_si.sh --nj $n --cmd "$train_cmd" data/mfcc/train data/lang exp/tri1 exp/tri1_ali
# lda_mllt # Input features are transformed with LDA+MLLT features and then trained with a three-phoneme model steps/train_lda_mllt.sh --cmd "$train_cmd" --splice-opts "--left-context=3 --right-context=3" 2500 15000 data/mfcc/train data/lang exp/tri1_ali exp/tri2b # lda_mllt_ali steps/align_si.sh --nj $n --cmd "$train_cmd" --use-graphs true data/mfcc/train data/lang exp/tri2b exp/tri2b_ali
if [ $stage -le 4 ];then echo'###### Bookmark: TDNN-F Chain Training ######' local/chain/run_tdnn-f_common_skip.sh \ --mfcc-dir data/mfcc/train --fbank-dir data/fbank/train \ --gmm-dir exp/tri4b --ali-dir exp/tri4b_ali fi
4. Prepare for the Language Model (LM)
This is the run_lm.sh file.
1 2 3 4 5 6 7 8 9 10 11 12 13 14
dir=exp/lm lm_dir= # the dir to store the LM gmm_mdl_dir=exp/tri4b # the place to store the gmm nn_mdl_dir=exp/chain-skip/tdnn-f-cn # the chain model dir
mkdir$dir # compress the language model from the open resource data_thchs30 tar czvf $dir/corpus.lm_e-7.tar.gz data_thchs30/lm_word/word.3gram.lm # transform the language model into G.fst ./utils/format_lm.sh data/lang $dir/corpus.lm_e-7.tar.gz data/lang $dir/lang_test # make the GMM acoustic model's lang files to compose with the G.fst into HCLG.fst ./utils/mkgraph.sh $dir/lang_test $gmm_mdl_dir$gmm_mdl_dir/graph # compose the chain model, lang files, and G.fst into the HCLG.fst ./utils/mkgraph.sh --self-loop-scale 1.0 $dir/lang_test $nn_mdl_dir$nn_mdl_dir/graph
5. Decode
We will use the ./decode_chain.sh, it will print the WER.
1 2 3 4 5 6 7 8 9 10 11 12 13 14 15 16 17
#!/bin/bash
. ./path.sh . ./cmd.sh exp_dir=exp/chain-skip/tdnn-f-cn # the AM and the storage path beam=13 # the threshold of the beam search, the bigger the beam the seach time will be longer and vice versa stage=-3 for data_set intest ;do# test corpus steps/nnet3/decode.sh \ --nj 8 --acwt 1.0 --post-decode-acwt 10.0 \ # the decoding params --cmd "run.pl" --iter final \ # use final.mdl to decode --stage $stage \ $exp_dir/graph data/fbank/$data_set$exp_dir/decode_graph_final done cat$exp_dir/decode_graph_final/scoring_kaldi/best_wer # check the decoding results
#result: %WER 21.75 [ 17647 / 81139, 149 ins, 664 del, 16834 sub ] exp/chain-skip/tdnn-f-cn/decode_graph_final/wer_10_0.0
7. Kaldi Vad
compute_vad_decision.sh
We can find the compute_vad_decision.sh in kaldi-egs/wsj/s5/steps/compute_vad_decision.sh.
8. Some Useful Tools in Kaldi
8.1 utils/run.pl
This will help the Kaldi run the system in multiple processing units,which makes the kaldi training more fast. We will discuss the nj later, since we will know num_jobs.
There is a very important tips here is that:
the nj value should smaller than the corpus speaker’s number. If there are 20 speakers in your corpus, you cannot set that number higher than that. If not follow this rule, it will send the errors.